What direction should a Y strainer face?
Install a Y strainer so the body flow arrow, inlet marking, or cast arrow follows the actual pipeline flow. Place the screen pocket, drain, plug, or wye side according to the product installation manual, often downward or at the lowest practical point for service access. For vertical lines, confirm the allowed flow direction and pocket position before installation.
Check the Body Arrow First
Use the marking on the Y strainer body as the first direction reference. Many Y strainers show a cast arrow on the body. Some products use wording such as IN or INLET.
Eaton’s Model 80/85 manual tells users to position the strainer so fluid enters the connection marked IN, INLET, or follows the arrow cast into the body.
Do not rely only on the direction of the handle, cover, or pipe branch. Those features help you read the layout, but the body marking gives the main flow direction check.
For product context, see the XHVAL Y Type Strainer page. Confirm product specifications, certifications, ratings, and delivery details separately before using them in a project.
Confirm Actual Pipeline Flow
Do not assume the pipe still flows in the direction shown on an old label or drawing. Before installing the Y strainer, confirm the real flow direction in the operating system.
Check:
- the process drawing or P&ID;
- the pump and equipment layout;
- upstream and downstream isolation points;
- existing flow arrows on the line;
- whether the line can ever experience reverse flow;
- the project engineer’s installation note;
- the manufacturer’s installation manual for that strainer model.
If the line direction is unclear, pause the installation decision and confirm it before startup. This matters during replacement work, pipeline modifications, and vertical-line installations.
Check the Screen Pocket and Service Clearance
Flow direction does not complete the orientation check by itself. The screen pocket, drain, blow-off, plug, or wye side also needs a position that supports debris collection and screen removal.
General third-party installation manuals tell installers to keep the drain or blow-off at the lowest position and leave space for screen removal. Legend’s Y-strainer installation guide and Keckley’s Y-strainer manual both include this type of guidance.
Before tightening connections, confirm that maintenance staff can:
- remove the plug or cover;
- reach the blow-off or drain connection;
- pull the screen out for cleaning;
- reconnect the cover or cap;
- inspect the gasket or sealing area during maintenance.
Flow Direction by Pipeline Layout
Horizontal runs usually make the direction check easier: match the body arrow to line flow and check whether the screen pocket sits below the main pipe. Vertical layouts need more care because the product manual controls the allowed flow direction and pocket position.
Use the table below as a review aid. Do not treat it as a replacement for the product installation manual.
| Pipeline layout | What to check | Safe wording for the article | When to confirm |
|---|---|---|---|
| Horizontal run | Body arrow, actual flow, pocket/cap position, screen access | In many horizontal installations, the pocket, cap, drain, or blow-off side faces downward. | Confirm when space is tight, pipe support is poor, or the manual shows a different position. |
| Vertical run | Allowed flow direction, body arrow, drain/wye position, screen removal access | Some models allow vertical installation, but the product manual controls the required flow direction and pocket position. | Confirm before installation if the manual is missing, the line flows upward, or the installation is critical. |
| Inclined run | Actual flow direction, lowest practical drain position, access clearance | Treat inclined layouts as conditional. Match the body arrow to actual flow and confirm the pocket or drain position. | Ask the manufacturer, supplier, or project engineer to review the layout before startup. |
| Unclear or modified layout | Possible reverse flow, old labels, and model-specific orientation limits | Do not install from guesswork. Use drawings, site confirmation, and the manual. | Confirm before purchasing, installing, or restarting the line. |
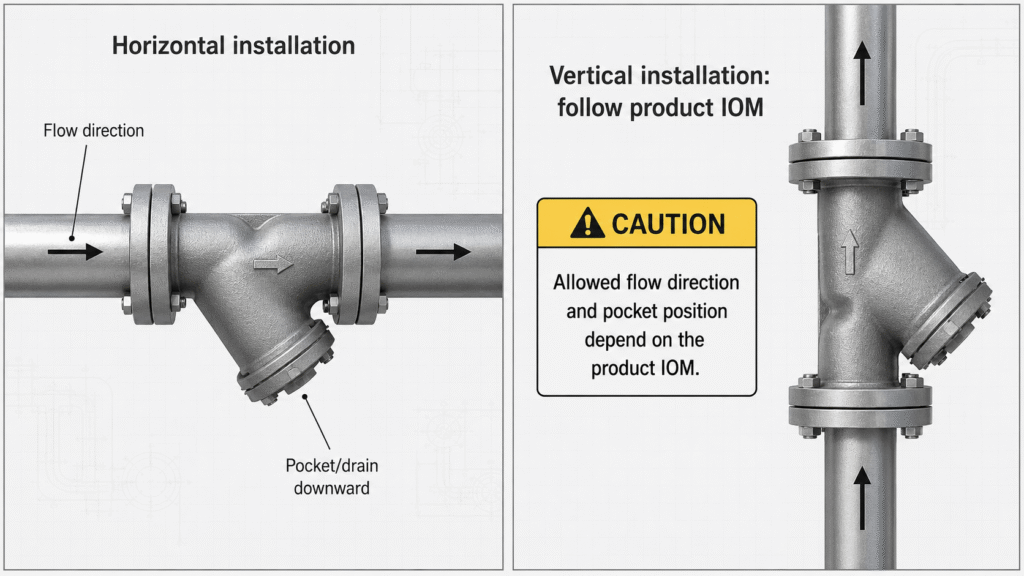
Horizontal Pipe Runs
For many horizontal pipe runs, use this basic check:
- point the body arrow with the actual flow;
- place the inlet side upstream;
- place the outlet side downstream;
- keep the screen pocket, cap, drain, or blow-off side downward when the manual requires it;
- leave enough space to remove the screen.
Also check pipe supports, flange alignment, service clearance, possible flow reversal, and media conditions before installation.
Vertical Pipe Runs
A Y strainer can sometimes work in a vertical line, but one rule does not fit every model. Some manuals specify downward flow for vertical piping. Other product designs may use different instructions.
Use this working rule: Follow the manufacturer’s manual for the exact model. Confirm the allowed flow direction, body arrow direction, and pocket or drain position before installation.
Inclined or Unclear Layouts
Inclined lines and crowded mechanical rooms can create direction mistakes. The arrow may look clear, but the drain may not sit at the lowest practical point. The pocket may face down, but the body arrow may not match actual flow.
Use this confirmation workflow:
- Mark the actual flow direction on the pipe.
- Compare it with the arrow or inlet marking on the strainer.
- Check whether the pocket, drain, or plug position matches the manual.
- Confirm screen removal clearance.
- Ask the supplier or project engineer to review photos or drawings if the layout remains unclear.
Backward Installation Checks
A backward Y strainer can affect the intended filtering function. KLINGER’s manual links reversed flow direction with improper filtering, so treat direction as a functional check.
Review these points before startup or final sign-off:
| Possible issue | What to inspect | Safe next action |
|---|---|---|
| The body arrow points against actual flow | Compare the arrow with confirmed line direction | Do not proceed with startup or final installation sign-off until someone corrects or reviews the direction. |
| Debris does not collect as expected | Inspect the screen and downstream equipment condition under the maintenance procedure | Confirm direction, screen condition, and cleaning interval with the manual. |
| The team cannot clean or remove the screen easily | Check whether the cover, cap, or plug has enough clearance | Recheck orientation and service access before operation. |
| The vertical layout does not match the manual | Compare the installed direction with the product instructions | Ask the supplier or engineer to review the layout. |
Avoid stronger claims unless product-specific evidence supports them. Do not say reverse installation will always damage equipment, cause a fixed pressure loss, increase energy cost by a specific amount, or shorten service life by a fixed period.
Pre-Installation Direction Checklist
Use this checklist before installation, startup, or supplier confirmation.
| Check item | What to confirm | Why it matters |
|---|---|---|
| Body arrow or inlet marking | Match the arrow, IN, or INLET marking to actual flow |
This gives the primary direction reference. |
| Actual pipeline flow | Confirm flow direction from drawings, equipment layout, or site review | Old labels or assumptions may be wrong. |
| Screen pocket / drain / plug | Match the pocket, drain, plug, blow-off, or wye side with the manual | This affects debris collection and service access. |
| Screen removal clearance | Leave enough space to remove the cover and screen | Blocked access makes maintenance harder. |
| Pipe support and alignment | Support and align the pipe without using the strainer to correct misalignment | Piping forces should not transfer into the strainer body. |
| Pressure and temperature range | Check the product rating against project pressure and temperature conditions | This is a confirmation item, not a general product claim. |
| Media and material compatibility | Review compatibility with product data or engineering input | The project must confirm this from product data or engineering review. |
| Connection type | Match threaded, flanged, welded, or other end connections to the project layout | Incorrect connection assumptions can block installation. |
| Manufacturer manual | Follow the product-specific installation manual | This matters most for vertical or unusual layouts. |
Use pressure, temperature, media, and material checks as confirmation prompts. Do not turn them into XHVAL-specific product claims unless approved product data supports the claim.
Where to Place a Y Strainer in a System
Place a Y strainer upstream of equipment that needs protection. Some manuals also give pump-side placement guidance, but the project team should check the pump, equipment, and strainer instructions together.
For an article on flow direction, keep placement advice short. Direction remains the main topic, not full system design.
Common placement checks include:
- What equipment should the strainer protect?
- Does the strainer sit upstream of that equipment?
- Can maintenance staff reach the screen?
- Does the layout follow the pump, valve, meter, or equipment manufacturer’s instructions?
- Can the team clean and inspect the strainer in that position?
For related product category context, see the XHVAL Strainer category page. Do not make exact system-layout prescriptions unless the project engineer, equipment manual, or product manual confirms them.
What to Send a Supplier to Confirm Y Strainer Orientation
When the flow direction or installation position is unclear, give the supplier enough technical context. A short message that says “Can this be installed vertically?” may not give enough information.
Send:
- pipe drawing or marked photo;
- actual flow direction;
- horizontal, vertical, or inclined installation position;
- medium or process fluid;
- pressure and temperature range;
- connection type and pipe size;
- screen or mesh requirement if known;
- available space for screen removal;
- whether the line can experience reverse flow;
- quantity;
- destination country or project location;
- requested documents, such as available drawing, installation manual, or product data.
This checklist helps technical sales, engineering, and procurement teams discuss the layout without guessing. It does not promise availability, certification, lead time, warranty, or price.
FAQ: Y Strainer Flow Direction
What is the correct way to install a Y strainer?
Install the Y strainer so the body arrow, inlet marking, or cast arrow follows the actual pipeline flow direction. Then check the pocket, drain, plug, or wye side against the product manual and leave enough room to remove the screen.
Are Y strainers directional?
Yes. Most Y strainers use body markings to show the intended flow path. Follow the body arrow, IN, INLET, or cast arrow marking when present. If the strainer has no marking or the layout looks unusual, confirm the direction with the product manual or supplier.
What is the correct position of the Y strainer?
The pipe layout and product manual decide the correct position. In many installations, the drain, plug, cap, or screen pocket sits downward or at the lowest practical point, while the body arrow follows actual flow. For vertical lines, check the manual for that exact model.
Which way should a Y strainer face?
Face the Y strainer so its body flow arrow points in the same direction as the real flow through the pipe. Also place the pocket or drain side so debris collection and screen access match the manufacturer’s instructions.
FAQ: Vertical Installation, Placement, and Supplier Checks
Can a Y strainer be installed vertically?
Some models allow vertical installation, but the product manual controls the allowed flow direction and pocket position. Do not assume every vertical Y strainer can handle either upward or downward flow.
What happens if a Y strainer is installed backward?
It may not filter properly. Compare the installed direction with the body arrow, confirm actual line flow, inspect screen access, and check the product manual before operation.
Where should a Y strainer be placed in a system?
Install a Y strainer upstream of equipment that needs protection, such as pumps, valves, meters, or other downstream components. For pump layouts and critical systems, confirm placement with the project design, equipment manual, and strainer manual.
What information should I send a supplier to confirm Y strainer orientation?
Send a drawing or photo, actual flow direction, pipe position, medium, pressure and temperature range, connection type, screen or mesh need, available service space, quantity, destination, and document requests. These details help the supplier review the layout without guessing.
Need Help Confirming Y Strainer Flow Direction?
Need to confirm Y strainer orientation for a pipeline layout? Send XHVAL your pipe direction, installation position, medium, pressure/temperature range, connection type, screen or mesh requirement, quantity, destination, and any drawings or photos. Ask which product documents are available before installation.