How Do You Identify an Industrial Valve?
To identify an industrial valve, start with the body style, handle or actuator, ports, flow direction, and system function. Next, record markings, nameplate data, valve tag details, size, material clues, medium, pressure, temperature, and end connection. Visual clues narrow the likely type, but drawings, operating data, documents, or supplier review should confirm the final choice. Many guides group valve functions around on/off service, flow control, directional flow, overpressure protection, and excess-flow protection. See this valve function overview for general context.
Why Valve Identification Matters Before Replacement or RFQ
A valve may look familiar from the outside. However, appearance alone rarely gives the full spec. Two valves can share a similar handle and body while they differ in pressure class, material, trim, end connection, sealing design, actuator type, or planned service.
Because of that, teams should identify the valve’s job before they select or quote a replacement. For example, a valve may start or stop flow, throttle flow, prevent reverse flow, redirect flow, relieve pressure, or isolate a section of piping. AS-Schneider’s valve classification guide explains these function-based categories in a piping context.
As a result, better identification helps engineers and buyers ask better questions. A supplier has more context to review the request when the inquiry includes photos, visible markings, valve size, medium, pressure and temperature conditions, connection type, actuator details, and drawings or P&ID references.
Industrial Valve Identification Workflow
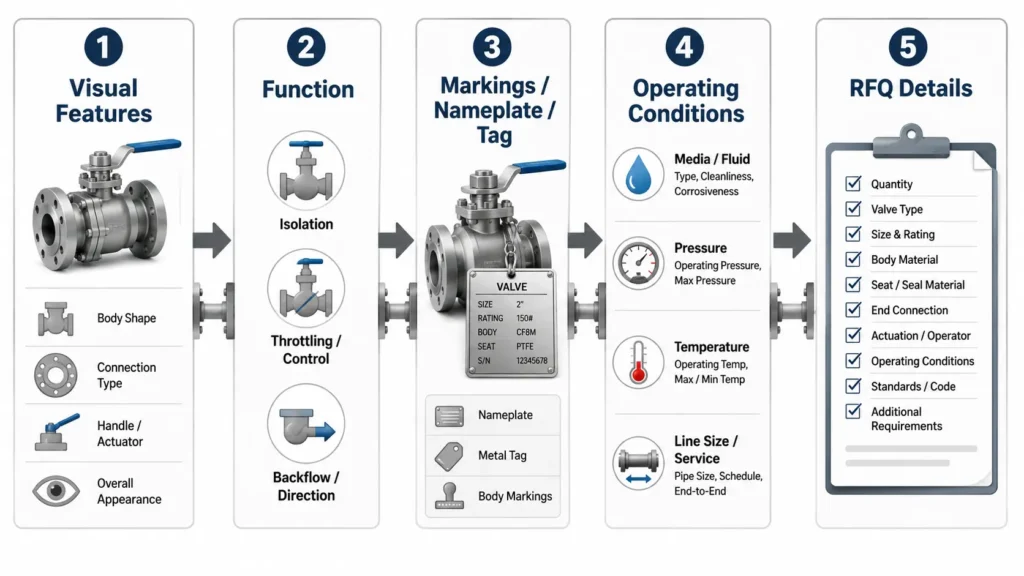
Use this workflow before you select a replacement, prepare a quotation request, or ask a supplier to review a valve.
| Step | What to check | What it can tell you | What still needs confirmation |
|---|---|---|---|
| 1 | Body style, bonnet, handwheel, lever, actuator, ports, and shape | May narrow the valve family, such as gate, globe, ball, check, butterfly, or plug | Exact model, pressure class, material, trim, seat design, and service limits |
| 2 | Valve function in the system | May show whether the valve handles isolation, throttling, non-return, flow direction, or pressure relief | Whether the function matches the design and operating conditions |
| 3 | Markings, nameplate, tag, flow arrow, and nearby pipe markers | May show size, rating, material, flow direction, service, manufacturer, oidentificationr internal valve ID | Product standard, project spec, current condition, and record accuracy |
| 4 | Medium, pressure, temperature, pipe size, connection, and orientation | Shows the main conditions that affect valve review | Material fit, pressure/temperature limits, sealing needs, and installation limits |
| 5 | Photos, drawings, P&ID reference, quantity, and document needs | Gives engineering, sales, or procurement useful context | Final fit, availability, commercial terms, and required records |
Step 1: Check Body Style, Handle, Actuator, and Ports
- front and side views;
- top view of the handle, stem, handwheel, or actuator;
- upstream and downstream pipe connections;
- any flow arrow;
- body markings or cast-in marks;
- nameplate or tag;
- nearby pipe marker or P&ID tag.
Step 2: Identify the Valve’s Function in the System
Next, look at what the valve does in the line. Function often tells you more than appearance.
Ask these questions:
- Does the valve start or stop flow?
- Does it control or throttle flow?
- Does it prevent backflow?
- Does it protect against overpressure?
- Does it redirect flow between branches?
- Does it isolate equipment for maintenance?
- Does it respond automatically to flow or pressure?
Many industrial fluid-system guides group valve functions around on/off service, flow control, directional flow, overpressure protection, and excess-flow control. This function-first view helps connect the physical valve to the task it performs in the system. See Swagelok’s valve function overview for general context.
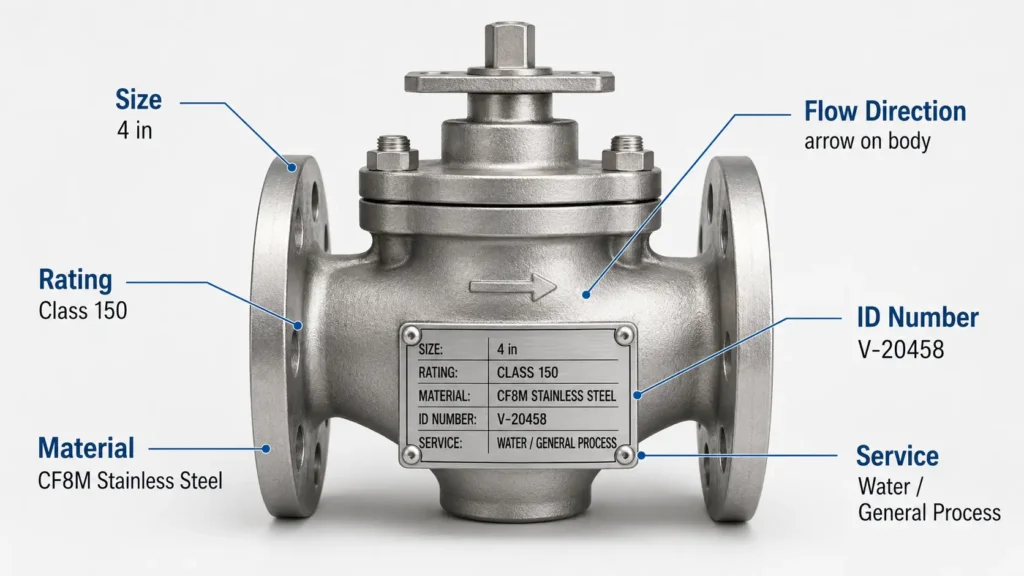
Step 3: Read Markings, Nameplate, Valve Tag, and Flow Direction
Then, record every visible marking. Manufacturers may place markings on the body, flange, identification plate, nameplate, or another visible area. ISO 5209:2019 covers marking requirements for general-purpose industrial valves, but you should read marking information together with the applicable product standard, performance standard, and project documents.
Look for manufacturer marks, size, DN or NPS, pressure class, material marks, flow arrows, model numbers, standard references, serial or batch numbers, facility tags, and service text. This information can support identification. However, it does not prove the correct replacement by itself.
Step 4: Confirm Operating Conditions and End Connections
After that, confirm the conditions around the valve. A similar-looking valve may fail the review if the system uses a different medium, pressure range, temperature range, material, actuator, or end connection.
Check the pipe or valve size, medium, pressure range, temperature range, end connection, body material, trim material if known, sealing material if known, actuator type, installation direction, flow direction, quantity, and document needs. AS-Schneider also notes that engineers may classify valves by operation method, end connection, material, pressure/temperature rating, and port size, not only by valve family.
Step 5: Prepare Supplier-Ready RFQ Details
Finally, turn the identification notes into a short RFQ package. The goal is simple: reduce guesswork before a supplier or technical reviewer checks the request.
A useful package includes photos, visible markings, suspected valve type, size, connection type, medium, pressure, temperature, material clues, operation method, flow direction, quantity, drawings, P&ID, valve schedule, old purchase record, and document needs.
Common Industrial Valve Types and What They Usually Do
There is no single universal “seven types of valves” list. Engineers may group valves by function, motion, operation method, connection type, material, pressure/temperature rating, or port size. Therefore, the tables below give common examples rather than a complete rulebook.
Isolation and Flow-Control Valve Families
| Valve type | Common clues | Typical role | Check before selection |
|---|---|---|---|
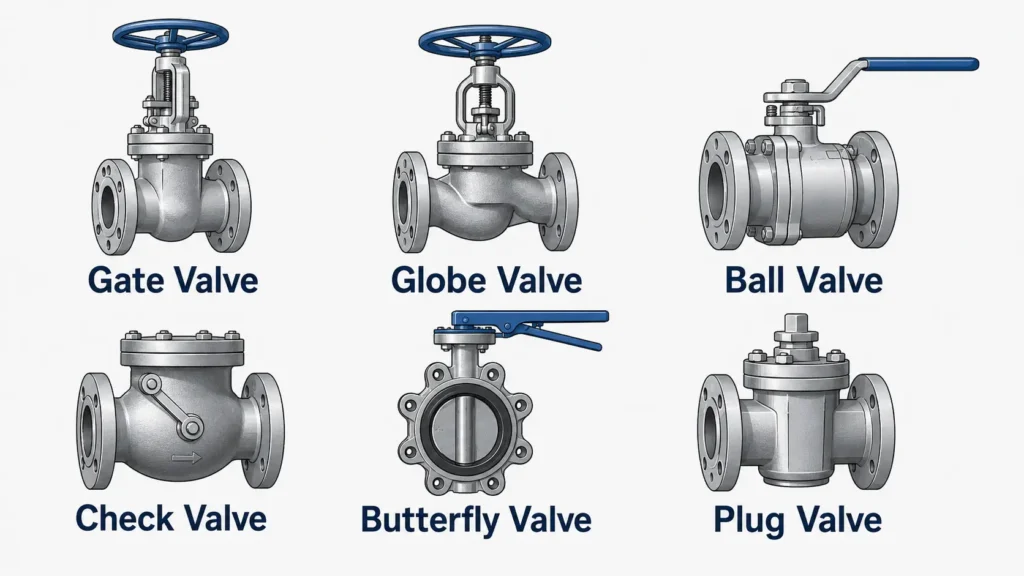
| Gate valve | Handwheel, linear stem movement, larger body/bonnet | Isolation or start/stop service | Service conditions, pressure/temperature range, connection type, and whether the service needs throttling |
| Globe valve | Rounded body, handwheel, changed internal flow path | Flow regulation, throttling, or stop/start service | Pressure drop, medium cleanliness, and control need |
| Ball valve | Quarter-turn lever or actuator, compact body, handle alignment clue | Fast on/off service | Port design, seat/seal material, pressure rating, and throttling limits |
Directional and Quarter-Turn Valve Families
| Valve type | Common clues | Typical role | Check before selection |
|---|---|---|---|
| Check valve | Often no external handle; may show a flow arrow | Non-return or backflow prevention | Flow direction, cracking pressure if relevant, mounting direction, and service conditions |
| Butterfly valve | Disc-and-stem design, wafer/lug/flanged body, lever or gear actuator | Isolation or limited control, depending on design and service | Seal type, pressure range, differential pressure, pipe size, and installation limits |
| Plug valve | Quarter-turn operation with a plug-style internal element | On/off service; some designs handle difficult media | Material, torque need, service conditions, and throttling limits |
How to Use These Type Clues
The tables give practical clues, not final selection rules. For example, AS-Schneider describes gate valves as valves that normally work fully open or fully closed, while globe valves can support stop/start and flow regulation. It also describes ball valves as quarter-turn valves and check valves as valves that prevent backflow. Use these clues to narrow the family; then check the spec, service, and documents before you choose a replacement. See the valve classification overview for broader context.
How to Read Valve Markings, Nameplates, and Tags
Valve markings and tags help turn a visual check into a clearer record. However, they do not all mean the same thing. A marking may come from the manufacturer. A facility tag may come from the plant’s asset system. A pipe marker may identify line contents. A P&ID tag may connect the valve to a drawing or maintenance record.
Product Markings and Nameplates to Record
| Field | Where you may see it | What it can indicate | Limit |
|---|---|---|---|
| Manufacturer mark | Body, nameplate, casting, or tag | Possible maker or brand | May not identify exact model or current condition |
| Size / DN / NPS | Body, flange, or nameplate | Nominal valve or pipe size | Must match the actual system and connection |
| Pressure class or rating | Body, flange, or nameplate | Pressure-related class | Review temperature, medium, project spec, and product documents |
| Material mark | Body, nameplate, or casting | Body or component material clue | May not confirm trim, seat, gasket, or media fit |
| Flow arrow | Body or tag | Intended flow direction | Still check the valve type and installation direction |
Facility Tags, Pipe Markers, and Drawing References
| Reference | What it helps identify | What it does not prove | When to check further |
|---|---|---|---|
| Facility valve tag | Internal valve ID, service, procedure note, or maintenance record | Exact manufacturer model, material fit, or rating | When the tag looks old, worn, or out of sync with drawings |
| Pipe marker | Fluid contents and flow context | Exact valve model or rating | When pipe service affects material or safety review |
| P&ID reference | System role, valve number, and relation to equipment | Physical condition or exact replacement part | When field changes may have changed the line |
| Lockout/tagout tag | Hazardous-energy control warning under site procedure | Routine valve spec or replacement fit | Before maintenance or service work, under authorized site rules |
Keep Standards as Context, Not a Shortcut
ISO 5209:2019 covers marking for general-purpose industrial valves. Also, an ANSI overview of MSS SP-25 describes marking systems for valves, fittings, flanges, and unions in piping connections. These references help frame the topic, but they do not prove that a specific valve fits a specific service.
In addition, ASME A13.1 covers pipe identification for fluids in aboveground piping systems. It gives pipe-marker context, not valve replacement approval. Brady’s valve tagging guidance also notes practical tag issues such as visibility, readability, placement, and environment. So, use tags and pipe markers as clues, then confirm the valve details.
Finally, lockout/tagout belongs to a separate safety process. OSHA’s lockout/tagout regulation covers hazardous-energy control during servicing and maintenance. Routine valve identification should not replace a site’s approved safety procedure.
What to Do When a Valve Tag or Marking Is Missing
Older plants often have missing, painted-over, damaged, or unreadable tags. When that happens, do not guess from one photo or one visual clue. Instead, build a better review record.
Do-Not-Guess Review Box
Do collect:
- photos from several angles;
- close-up photos of any partial marking;
- handle, actuator, stem, bonnet, and body details;
- pipe size and connection type;
- flow direction and installation direction;
- nearby pipe markers;
- P&ID tag, valve schedule, or asset number if available;
- medium, pressure, and temperature conditions;
- quantity required;
- old purchase or maintenance records.
Do not assume:
- material from color or paint;
- pressure class from body shape;
- valve type from handle shape alone;
- fit from a worn tag;
- replacement accuracy from a similar-looking valve;
- compliance from a facility tag;
- routine identification can replace site isolation or lockout/tagout steps.
For critical, hazardous, high-pressure, high-temperature, chemical, sanitary, or regulated service, follow the site’s engineering and safety review procedures before replacement. Do not select a replacement only from appearance, a partial tag, or a single photo.
What to Prepare Before Requesting a Valve Quote
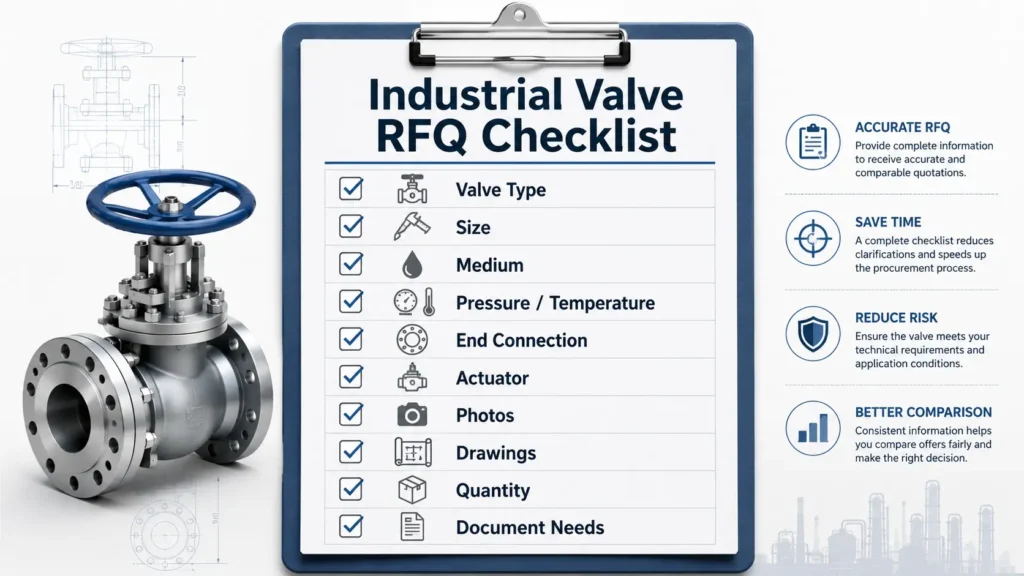
A strong RFQ helps a supplier or technical reviewer understand the valve before recommending an option. It can also reduce clarification cycles caused by missing details.
Quote Details to Collect
| RFQ detail | Why it matters | Example buyer note |
|---|---|---|
| Suspected valve type | Routes the request to the right product family | “Likely ball valve” or “unknown quarter-turn valve” |
| Valve size / pipe size | Checks body size, connection, and replacement fit | “DN50” or “2 in. line” |
| End connection | Matches the installation | Flanged, threaded, socket weld, butt weld, wafer, or lug |
| Pressure and temperature | Supports technical review | “Steam line; operating pressure and temperature to confirm” |
| Medium / fluid | Affects material and sealing discussion | Water, steam, air, oil, gas, chemical, or slurry |
| Operation method | Shows manual, actuated, or automatic operation | Handwheel, lever, gear operator, or pneumatic actuator |
| Photos and markings | Gives visual and product clues | Body, flange, tag, nameplate, and flow arrow photos |
| Drawings or P&ID | Connects field data to system design | P&ID tag, valve schedule, or drawing reference |
| Document needs | Helps avoid late project gaps | Inspection report, material document, drawing, or certificate request if applicable |
Keep Commercial Terms Separate
Before the supplier reviews the request, do not assume lead time, availability, MOQ, price, warranty, or compliance. Instead, send a complete technical package first. Then the supplier can confirm what applies to the specific valve, order, and project.
FAQ: Valve Identification Questions
How do you identify an industrial valve?
Start with the valve’s role in the system. Then record body shape, handle or actuator, ports, flow direction, markings, nameplate or tag data, size, pressure, temperature, medium, material clues, and photos. Finally, compare those notes with drawings, records, operating conditions, and supplier review. Do not rely on appearance alone.
What are the common types of industrial valves?
Common industrial valve families include gate, globe, ball, check, butterfly, and plug valves. However, no universal fixed list covers every use. Engineers may group valves by function, operation method, motion, end connection, material, pressure/temperature rating, or port size.
How do you read a valve tag?
Record the tag number, service text, line reference, flow direction, hazard or operation note, and any maintenance reference. Next, compare that information with the body markings, P&ID, valve schedule, and system conditions. Because facility tag systems vary, use the tag as a clue rather than final proof.
Can valve markings confirm pressure rating, material, or compatibility?
Valve markings can help identify size, rating, material, manufacturer, flow direction, or standard references. However, they do not confirm full fit on their own. Check pressure and temperature limits, material fit, sealing needs, project specs, product documents, and current operating conditions.
What should I do if the valve tag or marking is missing?
Take clear photos, record the location, pipe size, connection type, handle or actuator style, flow direction, nearby pipe markers, P&ID reference, medium, pressure, and temperature. If the service carries higher risk, follow engineering and safety review procedures before replacement.
What information should I prepare before requesting a valve quote?
Prepare the suspected valve type, size, end connection, medium, operating pressure and temperature, material markings, operation method, visible tag or nameplate data, quantity, photos, drawings or P&ID references, and document needs. Then let the supplier review fit, availability, and commercial terms.
Need Help Preparing Valve Details for Supplier Review?
Before you contact a valve supplier, prepare the details that reduce guesswork. Include:
- photos from multiple angles;
- close-ups of markings, nameplate, tag, and flow arrow;
- suspected valve type and function;
- valve size or pipe size;
- medium, pressure, and temperature conditions;
- material marking if visible;
- end connection;
- manual or actuated operation;
- quantity;
- drawings, P&ID, valve schedule, or old purchase record;
- document or inspection needs if they apply.
With these details ready, engineering and procurement teams can review the valve with less guesswork. Final selection should still match the actual system conditions, project documents, and supplier confirmation.